ramonn90
From Shiba to Tea: Water Texture Demo/Tutorial
Published: May 12th 2023, 4:28:14 pm
Hey everyone!
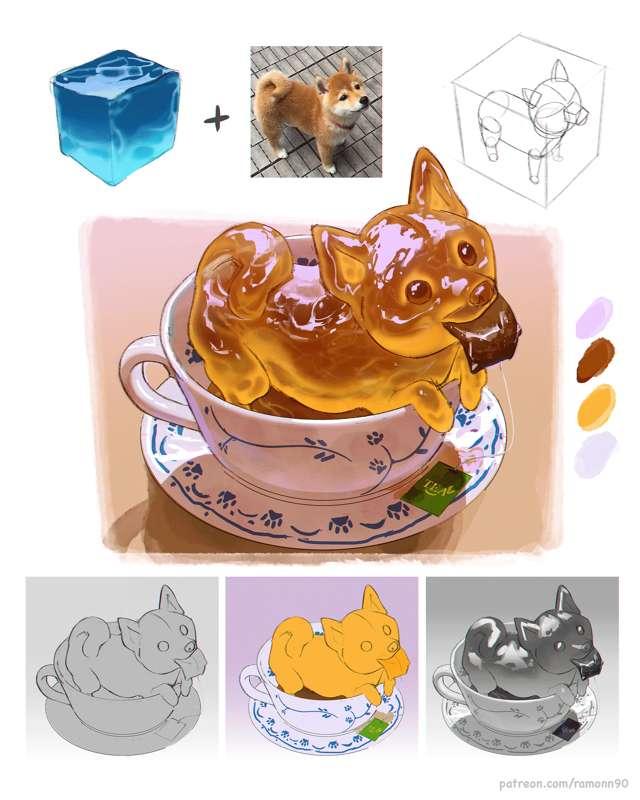
In light of recent discussions on Discord and the ongoing "MerMay" challenge, it seems like the perfect time to plunge into the fascinating subject of water rendering. Now, instead of going the conventional route with a basic square of water texture, I've decided to bring together two of my favourite things - our loveable Shiba Inu and a cup of tea, to create a unique shape for this tutorial.
Shape
- Looking at the drawing, you'll notice that it aims to mimic the dog's shape, but not entirely. It takes on more of a wavy form - a nod to the water element. It's not the entire body, but rather secondary parts of the anatomy where this effect is applied. It's essential to stay true to the face, as it's often the most recognizable part of the subject (in this case, the Shiba Inu). Feel free to experiment with different shapes if you're comfortable doing so. However, if you struggle with maintaining the resemblance to the reference, keep key features the same and play around with the rest. In the process video, you'll see how I started with a very solid shape for the anatomy. After careful consideration, I decided to revisit the drawing to inject more dynamism and better mimic the shape of water.
Values
- Our first task after defining the shape is determining the position of the light source. Here, I've chosen a top-down approach, a common scenario when dealing with water. Light behaves interestingly with water, and in this setup, the light source at the top will cause a reflective effect at the bottom. Consequently, this will leave the top of the shape darker and the bottom lighter due to the way light refracts or bends when it hits the water.
- When creating a character or shape that's encapsulated in water, it's essential to enhance the sense of volume. I recommend achieving this by adding a soft, lighter value around the shape's outline. This technique simulates the way light refracts and reflects at different angles when it interacts with a water surface, creating an illusion of the shape's surface catching the light.
- The highlight is the next crucial component in giving the water its characteristic appearance. Start with a sharp brush to outline this light, and remember that water is ever-changing, so irregular, wavy curves for the highlight borders will mimic the natural fluidity of water. The highlight should be placed where the light is coming from (in this case, the top) and it should avoid touching the light that's attached to the borders. This is because the light is refracted differently in areas where the water's surface is directly facing the light source, resulting in darker values.
- Lastly, to emphasize the transparency of water, try incorporating minor details inside or behind the object. This adds depth and layers to your work, enhancing the water's see-through nature. I've done this with a small tea bag, but don't limit yourself - get creative and explore!
Colors Shadows: For the darker areas, I suggest opting for less saturated hues. In my opinion, reserving saturation for mid-tone colors adds a sense of balance. For sea-themed art, a navy blue could work well.
Mid tones: This is where you can play with the same color you've chosen for the shadows, but in a more saturated version. If you're depicting the sea, you could even shift the blue towards green tones for a slightly turquoise effect.
Light: For highlights, white is a classic choice, but I often add a subtle hint of blue or purple. The tone you choose will depend on the mood you're aiming to create. If it's a warmer ambiance, you could try orange or even yellow.
Remember, while a typical sea picture might seem like the easiest route for a water demo, the real excitement lies in applying these principles to any subject that ignites your imagination. The challenge isn't to perfectly mimic reality, but to interpret and represent it in your unique style.
For those in the Mastering Maestro tier and above, I'll be sharing the PSD file and video process so you can delve into the step-by-step details and accelerate your learning. Looking forward to seeing your creations!
Welcome to all new patrons! Drop me a DM or join our Discord community if you have any questions. I usually respond within 24 hours.
For more information, check out our Patreon FAQ: https://ramonn90.myportfolio.com/faq and Patreon Catalogue: https://ramonn90.myportfolio.com/work
Have a great weekend and thanks for your support.