ramonn90
Rendering Techniques - Diving Deep into Rock, Fur, and Gold
Published: April 28th 2023, 6:48:53 pm
Hey guys!
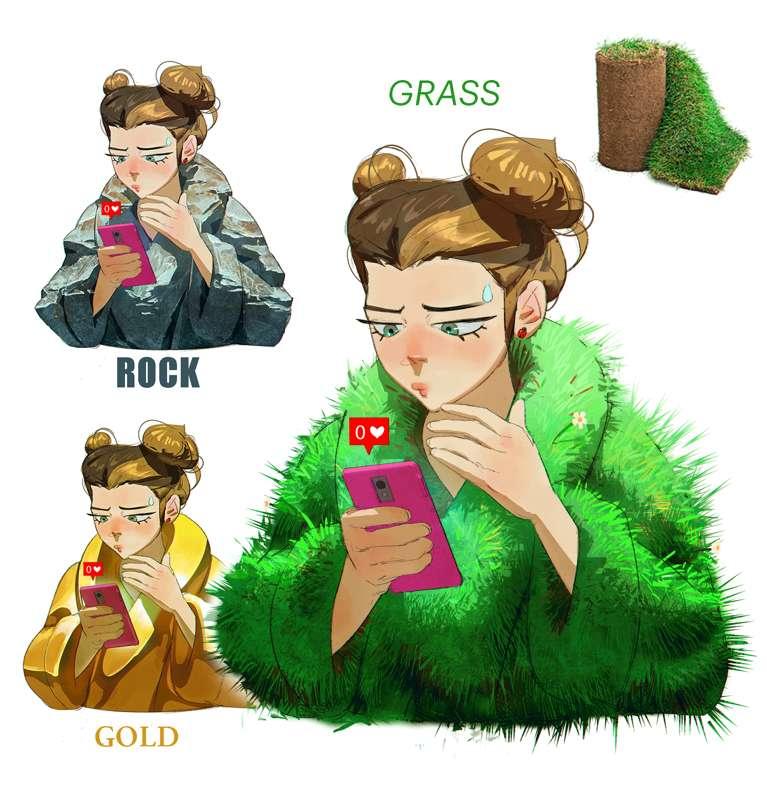
Today, we're diving into color theory and values with a focus on rendering textures, specifically textured (rock, fur) and metallic (gold, silver) surfaces. In a recent Patreon poll, these were the top choices, so I'll be using an image of an object to demonstrate how to achieve these textures. Let's get started!
Rendering Textured Surfaces: Rock and Fur
1. Rock Textures: To render a rock texture, start by observing real rocks and noticing the variations in color, shape, and surface irregularities. Begin with a solid base color, usually a very desaturated blue or red, and use a textured brush to add subtle color variations. Choose the same tone to make little bright or dark points around the surface; rocks are irregular, so think of shapes resembling rays when making lines. In a new layer on top, use the same "ray" shape border to define shadows, focusing on rectangular or triangular shapes and avoiding curves and clean lines. It's true that you can find perfectly round rocks in nature, but let's try the square shadow shape for now. To emphasize those rocks, add thin bright lines right next to the border of each shadow, and use less bright colors/values to make bigger triangles where you think the light will reflect. After this, maintain the structure and add different small tones of values to add more volume to the rock, but remember that the shape of shadow and light is what creates the texture.
2. Fur Textures: I created a grass/fur texture since the topic is nature, and fur is rendered pretty much the same. When rendering fur, observe how light interacts with fur in real-life examples. Start by laying down a base color and then add layers of individual hair strands using a fur brush or a small, tapered brush. This is mainly to create a flat texture/color/value. On top of that, create the shadow using a soft brush and erase the border of the shadow shape using the same fur brush or one similar to hair/grass; you'll find plenty in my brush set. As you erase, you can add shadow with the fur brush or the soft brush. The point of starting with the soft brush is to define the shadow position before exploring textures. Use lighter colors to indicate highlights, paying attention to the direction of light. In the beginning, you can use brushes with textures, but when adding lighting for fur/grass or anything detailed, try doing it by hand. These final touches will capture more attention since they're brighter, so try something more personal for the final touch. One difference between fur and grass is that the shade of hair might look more blurry, but you still need to apply the same treatment to shadow shapes to suggest the hair.
Extra! Rendering Metallic Surfaces: Gold
1. Gold Textures: Because metal reflects light even in the shadow side, define the shadow as you usually would; shadow on gold is desaturated and dark. Right where the shadow is positioned, create a new, less intense light that has less strength than the values on the already lighted version. You don't want two light sources to compete, so keep the second light source less bright. In this case, I positioned the second light from the bottom up. There's a third light projected from both arms and the body; like two walls of gold creating a saturated orange light. Make this light small but a bit stronger, not as bright as your primary source. We currently have three lights to create this gold metal texture. You can make the border between the primary light and the shadow very bright, almost white, but don't go overboard with this light because it might be too distracting. You can keep adding more values until you feel comfortable, but start simple, as this texture might be difficult to create.
Tips for Achieving Textured and Metallic Surfaces
1. Use Reference Images: Always refer to real-life examples when attempting to render textures. This will help ensure your textures look accurate and believable.
2. Layering: Build up textures by layering colors and details. Start with a base color, then add highlights and shadows, gradually increasing complexity.
3. Consider Lighting: The way light interacts with different surfaces plays a crucial role in achieving realistic textures. Observe how light falls on the textured or metallic surfaces and mimic those effects in your artwork.
4. Experiment with Brushes: Different brushes can create various textures and details. Try using textured brushes or creating your custom brushes to achieve the desired effect.
Understanding color theory, values, and rendering techniques is essential for creating compelling illustrations. By mastering these skills, you can bring your artwork to life and captivate your audience. Remember, practice makes perfect, so keep experimenting and refining your techniques.
Next week, I'll share the PSD file for those subscribed to tiers from Mastering Maestro up to Legendary Luminary. You'll be able to see the layer treatment and filters I applied to achieve these textures, which can be invaluable.
Have an awesome weekend, and thanks for your support!