nyl2
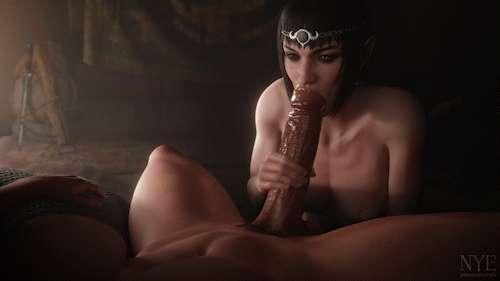
Open Animation: Morning Wood
Published: February 24th 2025, 7:59:02 pm
Overview
Ok, this is my first attempt at an open animation. I'll start briefly with a description and then outline what I'm trying to do with these.
An open animation is essentially an animation that's open for others to view. That means you can access the project file for it and everything within. Though this one isn't totally public since it's behind a Patreon tier, it is similar to Blender's open movie projects.
I created this as a tier incentive to give people a better peak behind the scenes at what my process is like and - similar to my breakdown posts - the reasoning behind my choices. This project file is free for you to use, alter, add on to, and render as you wish. If you ever post a derivative of this animation then that's fine, but please be sure to credit me as the original source. The main purpose of these open animations is as an educational tool. The animations themselves (without the project file) will be released publicly.
I don't recommend this as a tool for a total beginner to learn from. If you're still trying to figure out how Blender and 3D in general works, I'd recommend checking out someone like BlenderGuru. He has a great donut tutorial series for beginners, as well some videos for more intermediate users. This open animation however is for people who understand the software, but want to understand more about my animation process.
Now a couple things about the animations themselves. For these I want to make everything as simple as possible, so I didn't include any paid assets, plug-ins, or external simulation files. Typically my projects are going to look much more complicated than this, but I wanted everything to work and be self-contained for someone who only had Blender installed. So as a result, I'm just using my own assets along with ported game assets. Speaking of all that, now I'll go over the requirements.
Requirements
This project file was made in Blender version 4.2.0. That means that you should have little trouble opening it in later versions of Blender, but you'll have more friction moving it back. If you want to move it back to pre-4.0 versions, you may have to daisy-chain backwards with incrementally previous versions until you get the one you want. Keep in mind though, this animation uses the updated Eevee engine - Eevee Next - so if you move the file back to pre-4.2.0 then you'll encounter issues on the rendering side at the very least and it wont look like what I've rendered out.
Additionally, the fully rendered scene comes out to just under 8 GB of VRAM. Keep that in mind depending on the card you have. You can still delete, optimize, and mask if you're on something like a 4 GB card and you want to mess with lighting and rendering, but it might take some more know-how. Without the environment, the characters alone take about 5-6 GB of VRAM. Since they share a lot of the same textures, more can be added without costing much extra VRAM.
Breakdown

For the sake of simplicity, I primarily used the Dope Sheet for this animation and for the most part avoided the Graph Editor and the NLA (Nonlinear Animation) Editor. Everyone animates differently. Some use the dope sheet or graph editor exclusively, some only animate in the timeline, some use a mixture of everything, some use plug-ins, some don't, etc. Don't let how I chose to animate here dissuade you from your preferred method. The dope sheet is simply the best for control and organization, which makes it a great place to lay out an animation process.
I've placed markers that you can find at the bottom of the timeline and the dope sheet. These denote different stages of my animation process. I don't normally separate everything like this, as this method is just to show you what the animation looked like at each stage. I've also placed an overabundance of keyframes. This is to show when certain things were originally created or placed, even if the specific thing isn't being animated. Below I'll go through each marker and explain my thoughts.
Frame 0 - Rest Pose

Something that can sometimes confuse people about my animation files is the presence of a rest pose at frame 0. I keep this here for a variety of reasons:
1. I like to set up my model's bone order in the dope sheet ahead of time, which means I keyframe them, which happens at frame 0.
2. When making proportional changes, it helps to have the bone original proportions easily accessible (in this case, by just pressing down on the arrow keys).
3. The rest pose function on the armature can have a few drawbacks, such as being more inaccessible and not playing well with drivers. It can leave shapekeys on and it can take more clicks to get to.
4. Why use a rest pose at all? It's great for a ton of things. It gives you access to a perfectly symmetrical set-up of your model, it allows you to easily constrain things to the model (such as piercings, clothing, props), and the T-pose (or A-pose) allows you to access any part of the model for painting or sculpting. It can also be great to just give you a zeroed out version of your model for troubleshooting. All that and more.
Frame 10 - Proportional Adjustments

Typically I'll put any kind of proportional changes to the bones of the rig after the rest pose and before the actual pose itself. Like many other choices you'll see in this open animation, this gives me more clarity and control. It allows me to reference precisely what I changed and what I consider to be 'on model'. I keep this separate from the rest pose so that I can maintain the zeroed out bones for constraint purposes.
Frame 70 - Pose Blocking

Alright, now we're finally getting started. This is the stage where I'm just trying to hammer out a general concept for what I want the animation to look like. That means I'm doing a rough pose and figuring out where the camera might go. I'm not worrying about details, lighting, the environment, etc. unless it's important to the animation of the characters. Generally I'm keeping all of these things in my head at the same time, but I don't need to lock them in yet.
This is a pretty simple animation, so in this initial pose I was just trying to see if I could get all of the important elements in frame while still creating something with depth, focus, and balance. I didn't run into any issues here, so next it was time to refine.
Frame 80 - Pose Refinement

This is where the pose really starts taking shape. Now that I know that it can work, I can start figuring out the details. Adding asymmetry, blocking out the environment, and planning for the animation. A lot of things are happening pretty quickly at this stage.
First you'll notice I have two different environment collections: the white box and the final. Initially I'll usually white box important elements of an animation's environment, such as what the characters are interacting with or specific background elements. For this animation I just wanted to get an idea for the scale of the environment, what the characters were sitting on, and how the lines and angles of the environment would guide the viewer's eye in the frame.
Next you might be wondering about the importance of asymmetry. Now this starts getting into theory, but in general when we're thinking about nature and anything nature-related, there is a natural asymmetry. Anything with a human or human movement in it is going to be asymmetrical, even if I set up the camera with the goal of a symmetrical shot. If you come from an art background you might be familiar with the term 'contrapposto' or 'counterpoise', which is a type of asymmetrical pose often found in sculptures. It has significance in many areas, but one of its main importances is in providing a baseline to artists for what a natural pose might look like.
So what does any of that mean? Well the blunt answer is that if you want your poses to feel natural or organic, you can't make them perfect. Symmetry is at the core of perfection. And think: when was the last time you saw people boning in perfect symmetry?
Now why did I choose to change the pose in this way? Well first I started with Shadowheart and moved her left hand down and her right hand on the dick in order to open her up more to camera while still giving her some interaction. This way she still has a solid foundation to move from without making her feel closed off or guarded. The futa stayed mostly still at this stage because a lot of the asymmetry changes were introducing new elements or just weren't reading well. Since she wasn't the focus, I decided to come back to her later.
Frame 90 - Lighting & Environment


This is where the visual style of the image largely takes place. I tried out two different lighting set-ups for this one: the top one being A and the bottom one being B, and ultimately decided on B.
There's a ton I could say about lighting - it's an incredibly complex craft. But I'll just start off small. This shot uses a fairly standard three-point lighting set-up as a base and then builds from there. If you really don't know where to start with lighting, I'd recommend looking up that set-up first and figuring out the purpose for each kind of light: the key, fill, and back/rim/edge light. These lights are there to do a few very important things:
1. It gives form to the figures. Without light, everything is flat and featureless. Light can help give us an understanding of how something is shaped. It can also help emphasize or exaggerate shapes for us.
2. It separates elements in the frame. Light - through value or color - can help us distinguish foreground and background elements. This is the main purpose of a back light: to give an 'edge' to a character.
3. It helps guide the viewer's eye. Where you want your viewer to focus on and where you want their eye to go is a very important thing to consider. What's the focus of your frame? What's the movement going to be? Are there any important elements you'd like people to catch even though they're not the focus? Lighting is a great way to work towards these goals.
So why did I go with set-up B over set-up A? Well even though A accomplished #1 and #2, it wasn't working for me on #3. It was guiding opposite the natural direction of the image and giving me limited space to justify the lighting. I could imagine it working in a shot where I wanted the characters to seem more secretive or vulnerable - like if they were in a dungeon with an open door behind Shadowheart - but I wanted the shot to feel more calming and natural. Going with B gives me plenty of room to justify a softer, less overbearing light source while still giving me the ability to guide the viewer's eye across the frame.
Oh and one more thing about lighting: the eye light. Humans have natural, intense specular reflections in their eyes. It has become an expectation in media that 'life-like' eyes have these reflections and 'dead' eyes don't. Eye lights are used exclusively to add this type of reflection when no other light can, and they can go a long way to making your characters feel alive while also drawing attention to their eyes.
With the lighting being honed in I was able to start figuring out the environment at the same time. I knew from the white box I wanted a more enclosed, controlled space and I felt like something like a tent would work quite well and be appropriate for the subject matter. As I was working, the setting of a morning in a tent with light spilling through started taking shape.
So I added what assets I had that I thought might be able to reinforce this idea. Adventuring equipment, bed rolls, rugs, pillows, tapestries. Soft, transportable stuff that you could easily hang up, take down, and move. I even built a circular, yurt-like tent structure from scratch (that ended up getting mostly covered up).
I avoided showing an opening because I didn't want a harsh, direct light source overpowering the rest of the frame. The large, soft light source falling off from the left of frame hopefully gives the right impression without calling too much attention to itself. The placement of the backpack and weapons also gives the impression that there's an opening there, while at the same time fleshing out what the purpose of the environment might be.
All said and done its just a few objects, but it goes a long way towards establishing a sense of direction, place, time, and mood.
Frame 100 - Polishing and Loop Blocking

This is where the rubber finally meets the road.
To start off, I polished up the scene. I changed the camera slightly to minimize the negative space in the frame, while tying up some loose ends in the pose. The characters sort of felt like they were floating, so I increased the size of the big pillow bed and tried to bring a part of it into the frame. It not only helped with that, but it also gave the futa some asymmetry while making her feel less exposed to the 'outside' to the left of frame. I could have incorporated her right arm as well, but I didn't want much detail in the bottom right of frame. Other than that, I tweaked a few things and polished up the meshes with a few shapekeys.
Now that that's out of the way, we can finally talk about the actual animation.

This initial process is what's called 'blocking'. Blocking is used in a lot of different storytelling fields, but it originates from theater. In 3D animation, it means placing down the initial key frames to figure out the general timing and movement of the animation. If you're thinking in the context of a walk cycle, it's where you would be placing the contact, down, pass, and up poses.
Another way to think of it is outlining. For non-looped animation, you might be just figuring out character positions, general camera movements, and important expressions. Look at some early animatics from animation studios to get an idea of what this looks like.
Since this animation is pretty simple, I just wanted to test my boundaries a bit and get a feel for how much movement I could have. I also took this time to establish constraints - mainly around the dick's IK bones.
Frame 150 - Loop Refinement

At this stage I'm thinking more about the frames between the keyframes (the inbetweens) and incorporating more movement from the whole body. The shoulders, hands, spine, etc. It's also where I made a helpful proxy for the hand. Since I wanted the hand to rotate around the constraint point while it was moving up and down, I had a few options. Since I was doing this without NLA or animation layers, it's harder to create overlapping animation. I tried rotating the hand itself, but it posed issues with interpolation and gimbal lock (pray that you never have to look this up). The proxy - which is just an animated empty that the hand is constrained to - can provide an easy way to rotate the hand around the shaft smoothly. Animation is filled with little one-off rigging tricks like this, many of them often being much more complex.
I also created a target for Shadowheart's hair. Since I didn't want to use any simulation, I wanted some simple automated way to keep her hair in check during her head movements. We don't see her back during this shot, so a target sufficed. Essentially it's another empty constrained to her back that one of the hair bones always points to. If her hair was positioned around her shoulder and in front of her though, the solution would have had to have been much more complex.
You might notice from this and other parts of the finished animation that I'm really not wasting my time on what we don't see. This is a big difference between shooting single camera and multi camera in animation. Single camera allows you to cheat and cut corners, where-as rendering out multiple camera angles of the same action takes much more time when you factor in little hidden bits and different lighting set-ups.
Frame 200 - Loop Polishing

Now we get to really push things. I can't stress enough that this is a vital habit to develop as an animator. I could have stuck with the loop above, but I wanted to push the movement a lot further to see if I could get something more dynamic. Not only that, but I paid a lot more attention to the details like the lips and the fingers. I also took this time to establish any secondary animation that I was going to animate by hand. Since I usually simulate the breasts but refrained from simulation in this animation, I animated them later down the line.
At this stage you can start to really see a type of pattern emerge: a circular pattern. A simple way to put it is that mechanical things move in more rigid, linear motions, whereas organic things move with curves. An overt example of this is walking. The process involves going forward, but it's filled with little circles and ovals. A subtle example of this is throwing a punch. It might look fast and straight, but in reality there are different muscles being engaged at different levels and times, and the movement is filled with tiny curves and deviations.
This concept of curves and circles can be at the foundation of many animation principles: squash and stretch, slow-in slow-out, anticipation, follow-through - but is the basis of the arc principle. Whether or not you're new to animation, I highly recommend you read up on the twelve principles. When you're lost, they serve as a great guiding light.
Other than that I knew most of the futa's animation was going to take place outside of the loop, so I decided to save most of her for later.
Frame 300 - Animation Layout

During the animation layout we're thinking about the total length of the animation and timing out the broad elements. Normally this would be much more involved, but since this animation is simple it really just consists of copy-pasting the keyframes. If you're working with the graph editor then it has a whole host of tools to do this as well.
This part can be sort of intimidating because it's where you start to lock in a lot of things - especially for larger animations. There are all sorts of tricks you can do to cause as little destruction as possible, but at the end of the day you're forced to make some tough decisions. Going back and tweaking things can also be a pain.
You've probably noticed by now that I stay around 10 seconds for these short animations. It's just what I like the most but everyone has their own preferences.
Frame 600 - Animation Variance

Variance is where you really get to breathe life into the animation, but it can also be the most difficult part of the process. You make a ton of small decisions here and there's rarely a really clear path forward. At this stage you're really thinking about emotions, expressions, reactions, and transitions. Since this is a really simple animation, we don't have to worry about that last part.
Something like NLA or animation layers can really make this process much simpler because you can easily add additional animation to bones. Since I'm working with the bare bones here, it's a little more difficult for me to do and a lot more difficult for you to see all the things I did.
In essence you're trying to blend everything together and make things naturally lead from one to the other, all while creating emotions and reactions. Since we've established the context of the animation, it's easier to conclude what the characters are feeling. Shadowheart is focused and eager to please, and the futa is relaxed and (obviously) turned on. With that knowledge I can come up with expressions and little moments to help break up the overall action. I'm not worrying about finishing details as much, just the primary aspects of the animation.
Frame 1000 - Animation Polish & Simulation Set-up

Alright so when you look at this section in the file, you'll see it's three times the length. This is only really helpful when you're looping an entire animation. The purpose of this is:
1. To be able to loop simulated elements. For most simulations you'll be able to loop them from beginning to end if they just have an identical set of keyframes to run through first. In this instance, that happens to be 1000-1240. So the simulation would occur from 1000-1480 or 1000-1720 depending on if you need more time.
2. When you're working almost exclusively in the dope sheet, having a copy of the animation before and after the part you're rendering can help with interpolation for a smoother loop.
For non-looping animation, you might simply just have space before the animation starts to let the simulations settle, or have a few keyframes before and after so the motion feels more natural.
I also took this time to polish the animation. This is what many might consider to be the most boring part of the animation. It's a real slog, but at least it's less heavy on the decision making. This is where you're looking out for clipping, snipping out any elements that aren't helping, and spot checking certain elements in rendered view to make sure everything is looking right.
For something like the lips there are a lot of ways you can make life a bit easier on yourself. You can try to automate it with bone constraints, mesh deforming, shrink-wrapping, whatever. But I wanted to stay away from really advanced techniques here and if we're being honest there's rarely ever a silver bullet solution when you're working with these proportions. Usually something will break, and you have to know how to go in and fix it by hand. Automation is great, but it's good to know exactly how much time you're saving so you can gauge whether something is worth it or not. A lot of animation is about weighing the time cost of options.
Aside from that, the only time I relied on the graph editor with this animation was for the camera movements. Adding noise modifiers to the camera's transform channels can be great for getting subtle movement. Without animation layers it's a little harder to get it to loop well, but still doable.
I like using this kind of subtle movement for wider angles (24mm-35mm), but not quite so much for longer angles (50mm-85mm). It's partly about what feels 'right' about the shot. I usually don't think of wider angle shots being locked-off on a tripod like the longer lenses might be. Since a lot of my sex scenes are filmed with wider lenses, this usually results in more camera shake. For this angle in particular - if you look at where it's positioned in the environment - it would make more sense if someone was holding the camera anyways.
Rendering
I didn't employ a lot of post-processing here, so there isn't too much to talk about. I just hooked up a simple glare node in the compositor and rendered it all as one layer. For more complex projects you might separate the different elements (like the glare) into different rendered layers, but it wasn't necessary for this one.
I get plenty of questions about what I do in post to make my animations look the way they do, and the honest answer is that I do as much as I can in the viewport before I even have to think about post-processing. This means getting the lighting just right, checking my levels with false-color, dialing in the color of my scene, etc.
Conclusion
And that's about it! Since this is the first one I did, I wanted to outline it with details of my process. That meant going over a lot of basics that many people might already know. Future open animations probably won't contain this level of description. Also there's probably plenty I didn't go over in this project because there are just way too many details to cover.
Thanks for reading and feel free to mess around with the file. If you have my BG3 ports downloaded you could probably use the assets from there in this file as well to see what they might look like.